

Amanda@SOHO Voice Mail System
Changing the time on a Amanda@SOHO system can be done from any extension but you must log in as the administrator.
- Dial the voice mail pilot extension number (the same number normally used to check voice mail)
- When the voice mail system answers press "STAR"
- Enter "999#" then enter the administration password (default = 999) and press "#"
- Enter "883"
- Enter the date (MMDDYY) then press "#"
- Enter the time (HHMM) then press "#"
- The system will prompt for AM or PM
- Exit
AT&T 974 and 984
- Press the "Enter" navigation button to begin feature setup.
- Press the down arrow until the screen display includes TIME/DATE.
- Press "Enter". The screen display includes HOUR and the current hour setting.
- Press the right or left arrows until the correct hour displays.
- Press the down arrow to save the hour setting. The screen display shows "MINUTE" and the current minute setting.
- Press the right or left arrows until the correct minute is shown.
- Press the down arrow to save the minute setting. The screen display includes AM/PM and the current setting.
- Press the right or left arrow to toggle between AM and PM.
- Press the Down arrow to save the AM/PM setting. The screen display includes MONTH and the number of the current month setting.
- Press the right or left arrow until the number of the correct month is shown.
- Press the down arrow to save the month setting. The screen now displays DATE and the current day of the month setting.
- Press right or left arrows until the correct day of the month is shown.
- Press the down arrow to save the day of the month setting. The screen now displays DAY OF WEEK and the current setting.
- Press the right or left arrows until the correct day of the week is shown.
- Press the down arrow to save all settings. The screen now displays MAIN MENU.
- Press and hold the "Enter" key to return to the idle screen.
Avaya/Lucent Partner Telephone System
Must be done from extension 10 or 11.- Press Feature and dial 00.
- Press the left intercom button twice.
- To set the time, press # and dial 103. Enter the correct time using a 24-hour format.
- To set the date, press # and dial 101. Enter the correct date using MMDDYY format.
- Press feature and dial 00 to save.
Avaya Merlin Magix Phone System
Changing the time on a Avaya Merlin Magix system is accomplished from the system programming console. The date is change separately from the time.
Changing the date:- Press Menu
- Press System Program
- Press Exit or Start
- Press System
- Press Date
- Enter the date as mmddyy where mm = month, dd = day, yy = year
- Press Enter
- Press Exit or Back
- Press Home or Exit
- Press Menu
- Press System Program
- Press Exit or Start
- Press System
- Press Time
- Enter the date as hhmm where hh = hours & mm = minutes
- Press Enter
- Press Exit or Back
- Press Home or Exit
Avaya/Lucent Partner Telephone System
Changing the time on a Partner system must be done from extension # 10.
- At station/ext. # 10, press feature, 0, 0
- Press the left intercom 2 times
- Enter # 103
- Enter the correct time in 24 hr. format, for example:
- to set the time for 09:00 A.M., enter 0900
- to set the time for 04:45 P.M., enter 1645
- Press feature, 0, 0
Comdial Digitech
Changing time and date from attendant station:- Press the "ITCM" key.
- Dial *#01.
- Enter the date in YYMMDD format.
- Enter 2 digits (00-23) for hour and 2 digits for minutes.
- Press SPKR to end.
Comdial DSU/DSU II
- From extension 10, press "*#746*"
- Option One
- Dial "01"
- dial 00-99 for year
- Dial 10-12 for month
- Dial 1-31 for day
- Dial 00-23 for hour
- Dial 00-59 for minute.
- Option Two
- Dial 00-23 for hour
- Dial 00-59 for minute
- Dial "#" to assign hours and minutes.
- Press speaker to exit.
Comdial DX-80 System
Changing the time on a Comdial DX-80 system can be done from any display phone.
- Press Feature # * and enter in your password (Default password ########)
- Press Show and enter 0803
- Press Save then Show
- The option to change the Year will appear - if you do not need to change the year, press Next - if you need to change this value, press Chg, enter in two digits for the year and press Save then Next
- The option to change the Month will appear - if you do not need to change the month, press Next - if you need to change this value, press Chg, enter in two digits for the month and press Save then Next
- The option to change the Day will appear - if you do not need to change the date, press Next - if you need to change this value, press Chg, enter in two digits for the date and press Save then Next
- The option to change the Weekday will appear - if you do not need to change the weekday, press Next - if you need to change this value, press Chg, to select the weekday, and press Next
- The option to change the Hour will appear - press Chg and enter in two digits for the hour in military format - press Save then Next
- The option to change the Minutes will appear - press Chg and enter in two digits for the minutes and press Save
- Press the Hold button to exit programming mode
Comdial Executech
- Press ITCM *#.
- Dial 01.
- Dial two digits (00-99) for year.
- Dial two digits (01-12) for month.
- Dial two digits (01-31) for day.
- Dial two digits (00-23) for hour.
- Dial two digits (00-59) for minute.
- Dial one digit (1-7) for day of week. SUN = 1, SAT = 7
- Press * for next feature or press MNTR (SPKR) to end.
Comdial Impact
Comdial Impact - From Attendant Station
- Without picking up the handset, press "Intercom" and dial "*#01". The display should show "Set Clock".
- Set the year by dialing 00-99.
- Set the month by dialing 01-12.
- Set the day by dialing two digits 01-31.
- Set the hour by dialing 01-23.
- Set the minutes by dialing 00-59.
- Pick up and replace the handset to complete.
Comdial DXP
Top of PageESNA Telephony Office Linx
Date
- Go to main menu on ESNA (Telephony Office-Linx window).
- Choose "System" on the tool bar, then "Commands".
- Enter current date MM:DD:YYYY.
- Press "Execute".
- Choose "Exit".
- Minimize screen.
- Go to main menu as above.
- Choose "System" on the tool bar, then "Commands".
- Enter current time hh:mm (1:45pm would be entered 13:45).
- Press "Execute"
- Choose "Exit"
- Minimize screen.
Executone CX816
- From station 100, take the handset off-hook.
- Dial "*".
- Dial "7764" (PROG).
- Press the "FLASH" button.
- Dial "28".
- Enter time and date as follows: YYMMDDHHMMSS.
- Press the "HOLD" button.
Enter time and date in the following formats-
Year (YY) =00-99
Month (MM) =01-12
Day (DD) =0-31
Hour (HH) =00-24
Minute (MM) =00-60
Second (SS) =00-60
Executone Infostar VX II Voice Mail
- Press "SPKR" or lift handset. Press "436" to enter voice mail.
- Press the "#" key, mailbox "5000", press password "5000" (default on most systems, yours may differ) then the "#" key.
- Press "5" to change time and date.
- After the current date plays, enter the current date MM:DD:YY.
- After the time plays, enter the new time HH:MM:SS in military format.
- When finished, press the "*" key until you hear "exiting the system".
Executone Isoetec IDS via Operator's Phone M-32 Series
TimeSystem must have the TIME option enabled. Time may be changed only from a designated Operator Phone.
- Lift the Handset.
- At the dial tone, dial "28" then the 4-digit time in military format. For example, "1500" = 3:00PM.
- A confirmation tone is heard.
Executone Isoetec IDS via Operator's Terminal
The TIME option must be enabled on the system.
- While the terminal is idle, press and hold Ctrl and "C". Release both keys. The cursor moves to the Hour field.
- Enter the 2-digit hour in 24-hour clock format (ie., 16 for 4pm). The cursor moves to the Minutes field.
- Enter the 2-digit minutes. The cursor moves back to the Hour field.
- Press the Return key. The cursor moves to the Month field.
- Enter the 2-digit month, day and year. The system inserts the "-" automatically.
- Press and hold Ctrl and "C". Release.
Executone Isoetec Medley
Time- Press the "Menu" key.
- Press "Park 3".
- Enter the password (default is "456")
- Press "#".
- Press "1" for System Functions.
- Press "4" for System Clock.
- Enter the time in 12-hour format.
- Press "#"
- Press AM or PM by pressing "Park 3" in the LCD screen.
- Press "#" to confirm.
- Hang up or press "HF".
- Menu (F1)
- Park 3 Key
- Enter the Installer Password. 789 at Default.
- Press # to confirm
- Dial 9819
- Enter the Month
- Press # to confirm
- Enter the Day
- Press # to confirm
- Enter the Year
- Press # to confirm
Inter-Tel Axxent
From the attendant telephone- While the phone is idle, enter "9800". Display shows "DATE:"
- Enter Date MM:DD:YY. Press "#" to skip date entry.
- The display will show "TIME". Enter the time in 12-hour format.
- The display will then show: "Press 1 for AM, press 2 for PM". Select one.
- Press "#" to exit.
Inter-Tel Axxess Networked Systems
Networked Systems Only - From the attendant telephone- While on hook, enter the Set Network Date and Time feature code (9810). Your displays the current date.
- If you do not need to change the date, press "#" or ACCEPT to skip to the time prompt.
- Use the dialpads to enter month day and year mm-dd-yy format.
- If you make a mistake, press "MUTE" to backspace or "*" to start over.
- Use the dialpad buttons to enter the time in hours and minutes "0900" for 9:00.
- If 12-hour display is used, the display shows AM or PM. Press "1" for AM and "2" for PM.
Inter-Tel Axxess Non-Networked Systems
Non-Networked Systems - From the attendant telephone- While on-hook, enter "9800" for Set Date/Time feature. The current date will display.
- Press "#" to skip. To change, use keypad to enter the month, day and year (010305=January 3, 2005). The new date will display.
- Use keypad keys to enter the time in hours and minutes (0900=9:00).
- If the system is set for 12-hour format, the display will show select AM OR PM (AM=1 PM=2). Select 1 or 2.
- The display reads, "SYSTEM DATE AND TIME UPDATED".
Inter-Tel GLX-PLUS
Time- While on-hook, press "SPCL" and enter the Program Time/Date feature code (4)
- Enter the Program Time feature code (1). Display will show TIME XX:XX
- Enter the 2-digit number for hour (00-24) and 2-digit for minutes (00-59).
- Lift and replace the handset.
- While on-hook, press "SPCL" and enter the Program Time/Date feature code (4).
- Enter the Program Date feature code (2). Display will show DATE DAY MON XX
- Press "*" until the correct day is displayed. Press "#". Repeat for month and date.
- Lift and replace the handset.
- While on-hook, press "SPCL" and enter the Program Time/Date feature code (4).
- Enter the Program Date feature code (3). Display will show YEAR:XXXX.
- Enter 4 digits for the year (0000-9999).
- Lift and replace the handset.
Inter-Tel IMX 1224/2460
- While on-hook, press the "SPCL" key and enter the set time of day feature code (021). Display will show "SET TIME OF DAY".
- Use the keypad to enter the time in hours and minutes. Then press "*" for AM or "#" for PM. Display will show "SET DATE MM:DD:YYYY".
- Use the keypad to enter the month, day and year. Backspace to correct mistakes by using the "MUTE" key. Display will show "SET DAY OF WEEK SUN".
- Select the day of the week by scrolling through the selections. Press "#" to go forward and "*" to go back. When the desired day is displayed, press the "SPKR" key to end.
Inter-Tel Encore CX
- From the programming extension, press the PROGRAM key.
- Press the Scroll Down key until "System Programming" is displayed.
- Select "System Programming".
- Enter the System Programming password and select "System".
- Select "Time and Date".
- Enter the time in 24-hour format (ie. 11:50pm=2350).
- To change the time only, select "Confirm".
- To enter the date, enter in mmddyy format.
- Press the speakerphone key to finish programming.
Iwatsu ADIX Telephone System
Changing the time on an Iwatsu ADIX system can be done from the operator DSS console or from the attendant console.
From the Operator DSS when idle:- Press "ICM" + "FEAT" + "6" + "4"
- Enter the time "HH MM" using the 24 hour military clock
- Press "SPKR"
- Press "ETC" + "ETC" + "ETC" + "F1"
- Enter the time "HH MM" using the 24 hour military clock
- Press "RLS"
Key Systems Atlas 32 / 64 / 128
Changing the time on a Atlas 32, 64 or 128 system can be done from any display phone.
- Enter programming mode by pressing "PROG - PROG - 1 - 2 - 3 - HOLD"
- Enter mode 09
- Enter date "YYMMDD"
- Enter time "HHMM" (in 24 Hour format)
- Enter day of week 0 - 6 (4 for Thursday)
- Press "HOLD" at any stage to save a change
NEC Electra Telephone System
Changing the time on a Electra Elite & Professional system must be done from the "main" or primary phone. It is usually extension # 100.
- Press "FEATURE"
- Dial "9#"
- Enter hour and minute
- Press "RECALL" to change AM/PM setting
- Press "HOLD" to change the calendar setting
- Press "RECALL" to change the day of week
- Dial "#" to move the cursor to day of month field
- Enter day of month
- Press "RECALL" to select month
- Dial "#"to move the cursor to year field
- Enter last 2 digits of year
- Press "FEATURE"
Norstar Merdian
Press Feature.
Enter "**8463".
Enter the password (default is 266344). The display shows
Hour: 01
Next Change
Select CHANGE. Display shows:
Hour: __
Cancel
Enter two digits for the hour. Chose AM or PM when Prompted.
Select NEXT.
The display shows:
Minutes: 00
Next Change
Enter the minutes.
Press the RLS button to end, or press NEXT to change the date.
The diplay shows:
Year: 99
Next Change
Enter the two-digit year.
Select NEXT and repeat to change the month and day.
Press the RLS key to save the time and date and exit programming.
Norstar Meridian CICS
Time- Press "FEAT".
- Press "*".
- Press "*".
- Press "266344" (CONFIG) or "23646" (ADMIN).
- Enter password "23456" (ADMIN) or "72787" (SCPLUS).
- You will see "Terminals & Sets".
- Press "Next" five times.
- Press "Show"
- When you see "Hour", press "Change" or "Next" to skip.
- Type in the hour using military time as a 2 digit number.
- Press "Next".
- When you see "Minutes", press "Change" or "Next" to skip.
- Type in the minutes using a 2 digit number.
- Press "Next".
- When you see "Year", press "Change" or "Next" to skip.
- Type the year in 2-digit format.
- Press "Next".
- When you see "Month", press "Change" or "Next" to skip.
- Type the month in 2-digit format.
- Press "Next".
- When you see "Day", press "Change" or "Next" to skip.
- Type the day in 7-digit format.
- Press "Next".
- When you see "End of List", Press "Rls" to exit.
Nortel Norstar Telephone Systems
Changing the time on a Norstar system must be done using a display phone. Using a M7310 or T7316 the right 2 buttons under the display are "NEXT" and "SHOW" respectively.
- To enter programming mode press "FEATURE" and "* * 2 6 6 3 4 4"
- Enter password (default = 266344) - display should read "Terminals & Sets"
- Press "NEXT" 5 times - display should read "Time and Date"
- Press "SHOW" - display should read "Hour:___"
- Press softkey "CHANGE"
- Enter hour - display should read "AM OK or Change"
- Select AM or PM
- Press "NEXT" - display should read "Minutes:___"
- Press softkey "CHANGE"
- Enter minutes
- Press "NEXT" - display should read "Year:___"
- Press softkey "CHANGE"
- Enter year
- Press "NEXT" - display should read "Month:___"
- Press softkey "CHANGE"
- Enter month
- Press "NEXT" - display should read "Day:___"
- Press softkey "CHANGE"
- Enter day
- Press "NEXT"
Panasonic Digital Telephone System
Changing the time on a Panasonic digital system can be done from any display phone.
- Enter programming mode by pressing "PAUSE" then "STAR" button twice, followed by 1, 2, 3, 4
- Enter program # "000"
- Press "SPEAKER" button
- Press "FORWARD/DND" button to change to the hour selection
- Press "TRANSFER" button and enter the hour
- Press "FORWARD/DND" button to change to the minutes parameter
- Press "TRANSFER" button and enter the minutes
- Press "FORWARD/DND" button to change to the AM/PM parameter
- Press "MUTE" button to select AM or PM
- Press "STORE" button
- Press "HOLD" button
- Lift and replace handset
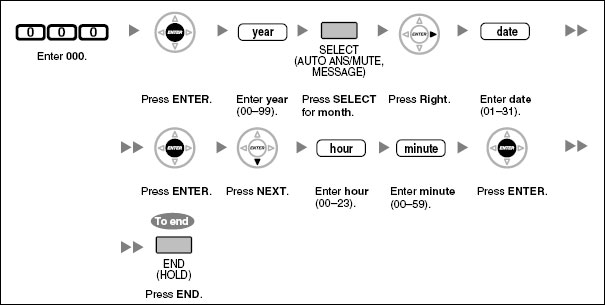
Panasonic KX-TA624 / KX-TA824 Telephone System
Changing the time on a Panasonic KX-TA624 or Panasonic KX-TA824 system must be done from extension # 101 using a display phone.
- Press the "PROGRAM" button on the face of the phone
- Enter programming mode by pressing "STAR" - "POUND" - "1234" (default password = 1234)
- Enter program # 000
- Press "SPEAKER" button
- Press "FWD/DND" button to scroll to the hour parameter
- Enter the time (1-12) by using the keypad to change the hour
- Press "FWD/DND" button to scroll to the minutes parameter
- Enter the time (00-59) by using the keypad to change the minutes
- Press "FWD/DND" to scroll to the AM/PM parameter
- Press "AUTO ANS/MUTE" button to select AM or PM
- Press "STORE" button (listen for 1 tone if procedure was executed correctly / 3 tones if procedure failed)
- Press the "PROGRAM" button on the face of the phone to exit
 Top of Page
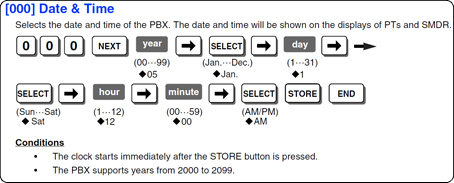
Panasonic KX-TDA50 System
Date & Time [000]
Date & Time/Daylight Saving�Date & Time [2-1-1]
-
The date and time of the PBX can be programmed. The date and time will be shown on the display of the extensions (e.g., PT, PS).
- None
Date & Time�Year, Month, Date, Week, Hour, Second
Indicates the current time and date. If needed, each parameter can be specified as desired (the day of the week is changed automatically to reflect the assigned date).
| Default | Current date and time |
| Value Range | Year: 2000�2099 |
| Month: 1�12 | |
| Date: 1�31 | |
| Week: Monday, Tuesday, Wednesday, Thursday, Friday, Saturday, Sunday | |
| Hour: 00�23 | |
| Minute: 00�59 | |
| Second: 00�59 |
Feature Guide References
Date & Time / Daylight Saving�Daylight Saving [2-1-2]
Daylight Saving Time sets the clock one hour forward at 2:00 AM on the start date, and one hour back at 2:00 AM on the end date. The start and end dates of a maximum of 20 different Daylight Saving Times can be programmed.
-
Setting
- 2.3.4 Automatic Time Adjustment
- None
- 2.3.4 Automatic Time Adjustment
- None
-
Enables Daylight Saving Time.
| Default | Enable |
| Value Range | Enable, Disable |
Feature Guide References
-
Feature References
Programming References
Start Date�Year, Month, Day
- Specifies the Daylight Saving Time start date.
| Default | Year: 2003 (For Daylight Saving Time number 1. The year advances by one for the subsequent Daylight Saving Times.) |
| Month: 4 | |
| Day: Day of the first Sunday of the month | |
| Value Range Year: | 2000�2099 |
| Month: 1�12 | |
| Day: 1�31 |
Feature Guide References
- Feature References
End Date�Year, Month, Day
-
Specifies the Daylight Saving Time end date.
- 2.3.4 Automatic Time Adjustment
- None
| Default | Year: 2003 (For Daylight Saving Time number 1. The year advances by one for the subsequent Daylight Saving Times.) |
| Month: 10 | |
| Day: Day of the last Sunday of the month | |
| Value Range | Year: 2000�2099 |
| Month: 1�12 | |
| Day: 1�31 |
Feature Guide References
-
Feature References
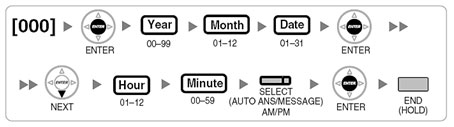
Panasonic KX-TDA50G System
Date & Time [000]
The proprietary telephones display the current date and time while on-hook.
- After changing the desired values, you can press the ENTER button. You do not have to perform the rest of the steps.
- The clock starts immediately after the ENTER button is pressed.
- You cannot leave a value empty.
- You can clear the entry by pressing the CLEAR button.
- To confirm your entry after storing data:
- The STORE button light: Lights red.
- Confirmation Tone:
- One beep: Your entry is accepted.
- Three beeps: Your entry is rejected.
Top of Page
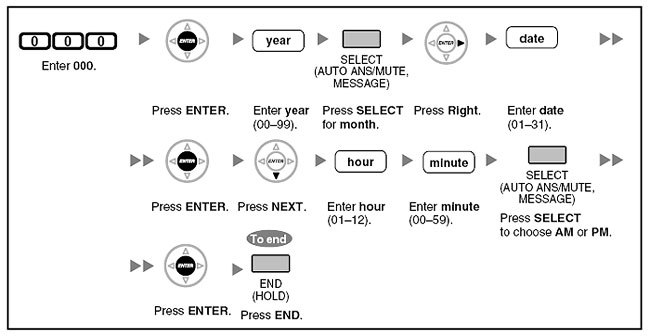
Panasonic KX-TDA100 & KX-TDA200 System
Date & Time [000]
The proprietary telephones display the current date and time while on-hook.
- After changing the desired values, you can press the ENTER button. You do not have to perform the rest of the steps.
- The clock starts immediately after the ENTER button is pressed.
- You cannot leave a value empty.
- You can clear the entry by pressing the CLEAR button.
- To confirm your entry after storing data:
- The STORE button light: Lights red.
- Confirmation Tone:
- One beep: Your entry is accepted.
- Three beeps: Your entry is rejected.
Top of Page
Panasonic KX-TDE100 & KX-TDE200 System
Date & Time [000]
The proprietary telephones display the current date and time while on-hook.
[In 12-hour Format]
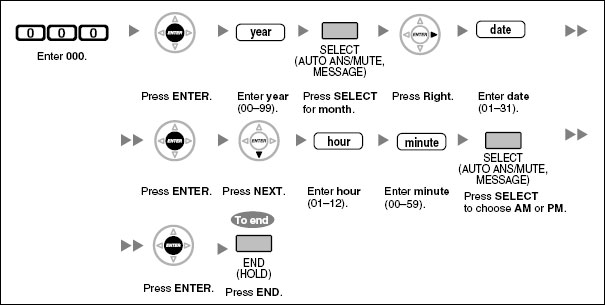
[In 24-hour Format]
- After changing the desired values, you can press the ENTER button. You do not have to perform the rest of the steps.
- The clock starts immediately after the ENTER button is pressed.
- You cannot leave a value empty.
- You can clear the entry by pressing the CLEAR button.
- To confirm your entry after storing data:
- The STORE button light: Lights red
- Confirmation Tone:
- One beep: Your entry is accepted.
- Three beeps: Your entry is rejected.
Top of Page
Panasonic KX-TVS Voice Mail System
Changing the time on a Panasonic KX-TVS voice mail system can be done from any phone.
- Dial the TVS pilot number (extension 107 or 115)
- When the voice mail system answers press "#" + "6" + "STAR"
- Log into the message manager's mailbox (999)
- Press "6" for other features
- Press "3" to set the time & date
- Press "1" to change the current time (press "0" for help)
- Enter the hour then press "#" or enter the hour and minutes then press "#"
- Press "1" for AM or "2" for PM
- Press "2" to accept the new time
PCS Digital
Set date and time through the display:- Press "Feat" "#" "0".
- At the "CHK PSWD:_ prompt, Enter "0000" (Default Password).
- From the soft menu, press "SAVE".
- Select "TIME" and press "SHOW".
- Press "CHG" and enter the "YEAR" and press "SAVE" then "NEXT".
- Press "CHG" until the correct month appears, then press "NEXT".
- Press "CHG" and enter the correct day, press "SAVE" and then "NEXT".
- Press "CHG" until the correct weekday is selected and then press "NEXT".
- Press "CHG" and enter the correct hour, press "SAVE" and then "NEXT".
- Press "24"
- Wait to hear the Auto Attendant Greeting
- Press "#".
- Press "#" "0".
- Enter the password (default is 9#56).
- Press "4" for "Date & Time".
- Press "1" to review date.
- Press 2 to change date and time
- Enter time in 24 hour (military) format.
- Enter the date MM:DD:YY
Samsung Prostar 816 System
Changing the time on a Samsung Prostar 816 system can be done from any display phone with the handset on-hook. (Do not lift handset off hook while programming.
- Enable technician programming mode
- Press "#" - "PROGRAMMING" is displayed
- Dial "20" - "MMC ENABLED" or "MMC DISABLED" is displayed
- Dial the password (default - 1234) - if wrong password is enter "ERROR" is displayed
- Dial "1" to enter program mode
- Press "#"
- Press "#" key - "PROGRAMMING" is displayed
- Dial "55" - the display shows "YY MM DD W HH MM" and then the current date is displayed
- Enter the new date
- YY = Last two digits of the year
- MM = Month (01 - 12)
- DD = Day of the month (01 - 31)
- W = Day of the week (1 -7 day of the week begins on Monday & ends on Sunday)
- HH = Hour (Use 24 hour clock)
- MM = Minutes (0-59)
- Press "#" - new date is saved
Toshiba CTX 100 Phone System
Any display phone can be used to change the time on Toshiba CTX 100 system. Do not lift the handset.
Enter programming mode:- Press "Hold"
- Press * # * # 1 * 2 * 3 *
- Display shows "Password ="
- Enter 0 0 0 0 (or applicable system programming password)
- Press "Hold"
- Display shows "Prog ="
- Enter 9 0 2
- Press "Hold"
- Display shows "Select Param"
- Press "Intercom" button
- Enter yymmdd where yy = year, mm = month, dd = day
- Press "Hold"
- Press "Hold" (again)
- List handset and hang up again
- Press "Line 1" button (should be button directly above intercom button)
- Enter hhmmss where hh = hours, mm = minutes, ss = seconds (military time)
- Press "Hold"
- Press "Hold" (again)
- List handset and hang up again
Toshiba Strata DK Telephone System
Changing the time on a Strata DK system must be done from the "main" or primary phone. It is usually extension # 10, or # 200.
- With the phone on-hook, dial intercom, #, 652 (depending on the system type, the # may or may not apply)
- Enter the correct time using HH/MM/SS, like 07:24:00
- Press redial
Toshiba DK 280
Date- From receptionist station, without lifting the handset, press "Intercom"
- Dial "#651"
- Dial the time in YY:MM:DD format.
- Press "Redial" or "#".
- Press speaker.
- From receptionist station, without lifting the handset, press "Intercom"
- Dial "#652"
- Dial the time in military format HH:MM:SS.
- Press "Redial" or "#".
- Press speaker.
- From receptionist station, without lifting the handset, press "Intercom"
- Dial "#653"
- Dial the day of the week (1-7).
- Press "Redial" or "#".
- Press speaker.
Toshiba Perception
- from attendant station
Follow all steps even if you wish to change only the time on your system.
- Display Date:
- Press the "DIS TOD" key.
- The date is now displayed as follows:
-
SRC cos DEST
Month Day Year
Set Date:
Enter the date on the dial pad in MMDDYY format. The new date is displayed.
- Display Time:
- Press the "DIS TOD" key again.
- The time is now displayed as follows:
-
SRC cos DEST
Hours Minutes Seconds
Set Time:
- Enter the time in military time HHMMSS format (for example, 090105 for 9:01 am and 5 seconds and 210105 for 9:01pm and 5 seconds). The new time is displayed.
- To Start the Clock and Clear Display:
Press the "DIS TOD" key a third time.
Vodavi Infinity
From any 24-button display phone:
- Enter programming mode by dialing **3226 from any 24-button display phone.
- Press FLASH and dial 11
- The display should show:
-
DATE & TIME
MM/DD/YY
HH:MM am - Choose display format by pressing the appropriate button in the flexible button field.
- Press the HOLD button or dial in the time and date as follows (12 digits): YY MM DD HH MM SS
- YY = Year (00-99)
- YY = Year (00-99)
- MM = Month (01-12)
- DD = Day (01-31)
- HH = Hour (00-23)
- MM = Minute (00-59)
- Press HOLD to save. A confirmation tone plays and the display updates.
Vodavi Starplus 616, 1224, 2448, and 96EX
From the First Attendant Station:
- Press ON/OFF Button
- Dial 76 on the dial pad
- Enter date and time as follows: YY MM DD HH MM
- YY = Year (00-99)
- MM = Month (01-12)
- DD = Day (01-31)
- HH = Hour (00-23)
- MM = Minute (00-59)
- Press HOLD
Vodavi Starplus-Tria, Digital, Mach I, Infinity, DVX and XTS
From the First Attendant Station:
- The first attendant station may set system time and date.
- Dial [692]
- Enter date and time as follows: YY MM DD HH MM
- YY = Year (00-99)
- MM = Month (01-12)
- DD = Day (01-31)
- HH = Hour (00-23)
- MM = Minute (00-59)
- When the correct number of digits are entered, a confirmation tone sounds.
Vodavi Starplus STS System
System Time/Date must be set by the first programmed Attendant via admin programming or using feature code 692.
To set using the feature code:
- Dial [692] on the dial pad. A confirmation tone will sound.
- Enter date and time as follows: YYMMDDHHMM
- YY = Year (00-99)
- MM = Month (01-12)
- DD = Day (01-31)
- HH = Hour (00-23)
- MM = Minute (00-59)
- When the correct number of digits are entered, a confirmation tone will sound.
- Press the ON/OFF button to OFF to update the display.
Worldwide Daylight Saving
| Continent | Country | Beginning | Ending |
|---|---|---|---|
| Africa | Egypt | Last Thursday in April | Thursday in September |
| Namibia | First Sunday in September | First Sunday in April | |
| Tunisia | Last Sunday in March | Last Sunday in October | |
| Asia | Most states of the former USSR | Last Sunday in March | Sunday in October |
| Iraq | April 1 | October 1 | |
| Israel | Last Friday before April 2 | The Sunday between Rosh Hashana and Yom Kippur | |
| Jordan | Last Thursday of March | Last Friday in September | |
| Lebanon, Kyrgyzstan | Last Sunday in March | Last Sunday in October | |
| Mongolia | Fourth Friday in March | Last Friday in September | |
| Palestinian regions | First Friday on or after 15 April | First Friday on or after 15 October | |
| Syria | March 30 | September 21 | |
| Australasia | Australia - South Australia, Victoria, Australian Capital Territory, New South Wales, Lord Howe Island | Last Sunday in October | First Sunday in April |
| Australia - Tasmania | First Sunday in October | Last Sunday in March | |
| New Zealand, Chatham | Last Sunday in September | First Sunday in April | |
| Tonga | First Sunday in November | Last Sunday in January | |
| Europe | European Union, UK | Last Sunday in March at 1 am UTC | Last Sunday in October at 1 am UTC |
| North America | Mexico Bermuda, St. Johns, Bahamas, Turks and Caicos | First Sunday in April | Last Sunday in October |
| United States, Canada (excluding Saskatchewan and parts of Quebec, B.C., and Ontario) | Second Sunday in March | First Sunday in November | |
| Cuba | April 1 | Last Sunday in October | |
| Greenland | Last Sunday in April | First Sunday in October | |
| Honduras | May 7 | August | |
| Mexico (except Sonora) | First Sunday in April | Last Sunday in October | |
| Nicaragua | April | October (dates vary) | |
| South America | Argentina | tbd | tbd |
| Brazil | First Sunday in October | Third Sunday in February | |
| Chile | October 11 | March 29 | |
| Falklands | First Sunday on or after 8 September | First Sunday on or after 6 April | |
| Paraguay | Third Sunday in October | Second Sunday in March |